Project 1: Photograms
A photogram is a photographic print made by placing objects onto light sensitive paper and exposing it to light from above, in a dark room. The paper is then developed by using light-sensitive chemicals in the darkroom. The end product of this process, results in a negative shadow image varying in tone, depending on the transparency of the objects used. Areas of the paper that have received no light appear white; those exposed through transparent or semi-transparent objects appear grey.
The Darkroom
The darkroom is necessary, and the set up is as follows;
1.) Inside is a dim red light which allows you to see what your doing, but also is a safe colour because of the light sensitive photographic paper . The chemicals in the paper would react to white light and become overexposed, ruining the desired effect, therefore red light is considered a 'safelight'. The dark room has 2 sets of curtains to be safe of any other light entering the room. The photographic paper is put in a bag and then put in a drawer for extra precautions.
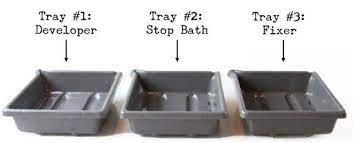
2.)Once you have taken your image, there is a series of liquids the paper must be put through, the first being the developer. This is a solution which makes the image visible on the paper, and the paper stays in this for 2 minutes.
3.)The next liquid is the stop which stops the developer to ensure the image doesn't turn black, and the paper stays in this one for 1 minute.
4.) The next liquid is the fix, which permanently fixes the image onto the photographic paper, and this stays in there for 5 minutes.
5.) Finally the paper if put into the wash bath to be rinsed clean.
6.) Darkroom trays are also sometimes used, for example if experimenting with double exposure, you put your paper in the developer for 30 seconds, then take it out, put it in the darkroom tray and expose it to light again.
7.) The enlarger is a box with light inside that transmits light through first through a negative and then a lens. The resulting reversed image is projected onto the photographic paper which is then placed in the chemicals.
Here are some examples of a safelight, wash bath, enlarger, and developer, stop and fixer:
The Darkroom
The darkroom is necessary, and the set up is as follows;
1.) Inside is a dim red light which allows you to see what your doing, but also is a safe colour because of the light sensitive photographic paper . The chemicals in the paper would react to white light and become overexposed, ruining the desired effect, therefore red light is considered a 'safelight'. The dark room has 2 sets of curtains to be safe of any other light entering the room. The photographic paper is put in a bag and then put in a drawer for extra precautions.
2.)Once you have taken your image, there is a series of liquids the paper must be put through, the first being the developer. This is a solution which makes the image visible on the paper, and the paper stays in this for 2 minutes.
3.)The next liquid is the stop which stops the developer to ensure the image doesn't turn black, and the paper stays in this one for 1 minute.
4.) The next liquid is the fix, which permanently fixes the image onto the photographic paper, and this stays in there for 5 minutes.
5.) Finally the paper if put into the wash bath to be rinsed clean.
6.) Darkroom trays are also sometimes used, for example if experimenting with double exposure, you put your paper in the developer for 30 seconds, then take it out, put it in the darkroom tray and expose it to light again.
7.) The enlarger is a box with light inside that transmits light through first through a negative and then a lens. The resulting reversed image is projected onto the photographic paper which is then placed in the chemicals.
Here are some examples of a safelight, wash bath, enlarger, and developer, stop and fixer:


Man Ray
Man Ray created his photograms or 'Rayograms" as they are known, by placing objects-such as the thumbtacks, coil of wire, and other circular forms directly on a sheet of photosensitized paper and exposing it to light. Man Ray had photographed everyday objects before, but these unique, visionary images immediately put the photographer on par with the avant-garde painters of the day. Hovering between the abstract and the representational, the rayographs revealed a new way of seeing that delighted the Dadaist poets who championed his work, and that pointed the way to the dreamlike visions of the Surrealist writers and painters who followed.

|

|

|
Test Strip

|
Once you have entered the darkroom, you set the the times of the light according to how exposed you wish the image to be, and to work out the perfect time you create a test strip. Test strips are essential in order to produce a quality photogram.The correct export time for me was 5 seconds, according to this test strip. To create this test strip I placed a piece of black card over most of my photographic paper and objects on top, and then exposed it or 1 second. I repeated this process several times while moving the card further to the left of the photographic paper, and this test strip showed me that the perfect exposure time was 5 seconds. To the left is my test strip:
|
Photogram Prints and Processes
Painting on developer
|
To create the painted effect, it's the same process as any other photogram, up until the developer. You take a paintbrush and dip it into the developer and paint your paper, rather than placing it in the tray. It creates a contrasting effect if you leave some parts not developed. As you can see from my example, I painted in random curved lines across my image, leaving some part undeveloped, or less developed. In this image my objects were scissors, string and a necklace.
|

|
Double exposure

|
For double exposure, I exposed my image for 2 seconds under the enlarger, I then moved the obejects around and exposed it for a further 2 seconds. The chemical process is the same; developer, stop, fix, water bath. For my example of double exposure, I used a piece of metal and exposed it horizontally, and then vertically, creating the pattern.
|
Sandwich print
|
To create the sandwich effect, i sued a previously developed photogram, and placed it on top of a fresh piece of photographic paper. I then exposed it under the enlarger for 8 seconds (a lot longer than a usual photogram), and then did the same chemical processing. As my objects, I used a leaf, because within this task we were also required to incorporate the contrast between manmade items and nature.
|

|

|
Solarisation

|
To create the solarisation effect, I exposed the image for 3 seconds, then put it in the developer tray until I could just about see the image start to come through. I then placed it in the darkroom tray and under the enlarger, and exposed it for a further 2 seconds. Then back into the developer, and then the rest of the chemicals. The aim when doing this technique is to create a glowing effect on the objects, mine were bulldog clips. When experimenting with different objects I found that non flat objects worked better for this effect
|
Weave
|
In creating my weave, I used 2 sandwich print photograms together because I thought they would make a contrasting effect due to their opposite colours. The objects I sued were buttons and I like the effect they make in this print of buttons with multiple tones. The end result will still create a full photo, but with a more abstract effect. I cut one photogram landscape, and the other portrait, both leaving a 1cm gap between each strip. I then cut up the strips, and wove them in between each other.
|

|
Movement

|
In terms of creating the movement effect, the object I used was a fork. before exposing to the light, I decided the amount of times I wanted to move the fork, I chose 7 times. According to my test strip, the optimum time is 5 seconds, and so I re-exposed the image moving the fork, every 0.7 seconds. The chemical processing is the same, developer, stop, fix, water bath.
|
Project 2: The Pinhole Camera
The pin hole camera is probably the simplest camera you can imagine and is based on the camera obscura, which is a large room or container that has been blacken out except for a small hole of light. Pinhole cameras rely on the fact that light travels in straight lines – a principle called the rectilinear theory of light. This makes the image appear upside down in the camera. When the shutter is opened, light shines through to imprint an image on photographic paper or film placed at the back of the camera. This can be achieved simply in any room with a window that is blacked out except for a small hole in front of the window. The use of the photographic paper allows the image that is being reflected projection of the view to be reflected. The paper inside should only be exposed to light once before being developed (unless this final image wanted is double exposure).
To make my own pin hole camera I used a beer can, black card and black gaffer tape. Here is the process:
1.) Measure out a piece of card and cut strips of 1 cm into the top. Also measure out a circle the size of the can lid
2.) Using a can opener take off the lid of the beer can
3.) Wrap the card around the beer can
4.) Place the circle on top and then tape the lid with gaffer tape
5. Make a small hole in the front of the can
6.) Cover the hole with electrical tape

|

|
Ben Nathan
Ben Nathan works across different media, from painting and photography to film and sculpture. His artistic skills reflects on the functionality of the city and its industry and documenting urban change. His explorations into infrastructure and photography questions the changing nature of our cities environment and access to public or private space. The section Stenopw (pinhole) features recent analogue photography projects, using traditional chemical based processes. It includes portraits taken using the pinhole beer can, a DIY camera made from an up-cycled beer can. Ben Nathan has also experimented with the pin hole camera idea using a caravan which Nathan transformed into a large scale pin hole camera. I was inspired by his work to make my own pin hole camera because it's interesting how you can take a photograph with such an everyday object like a been can.
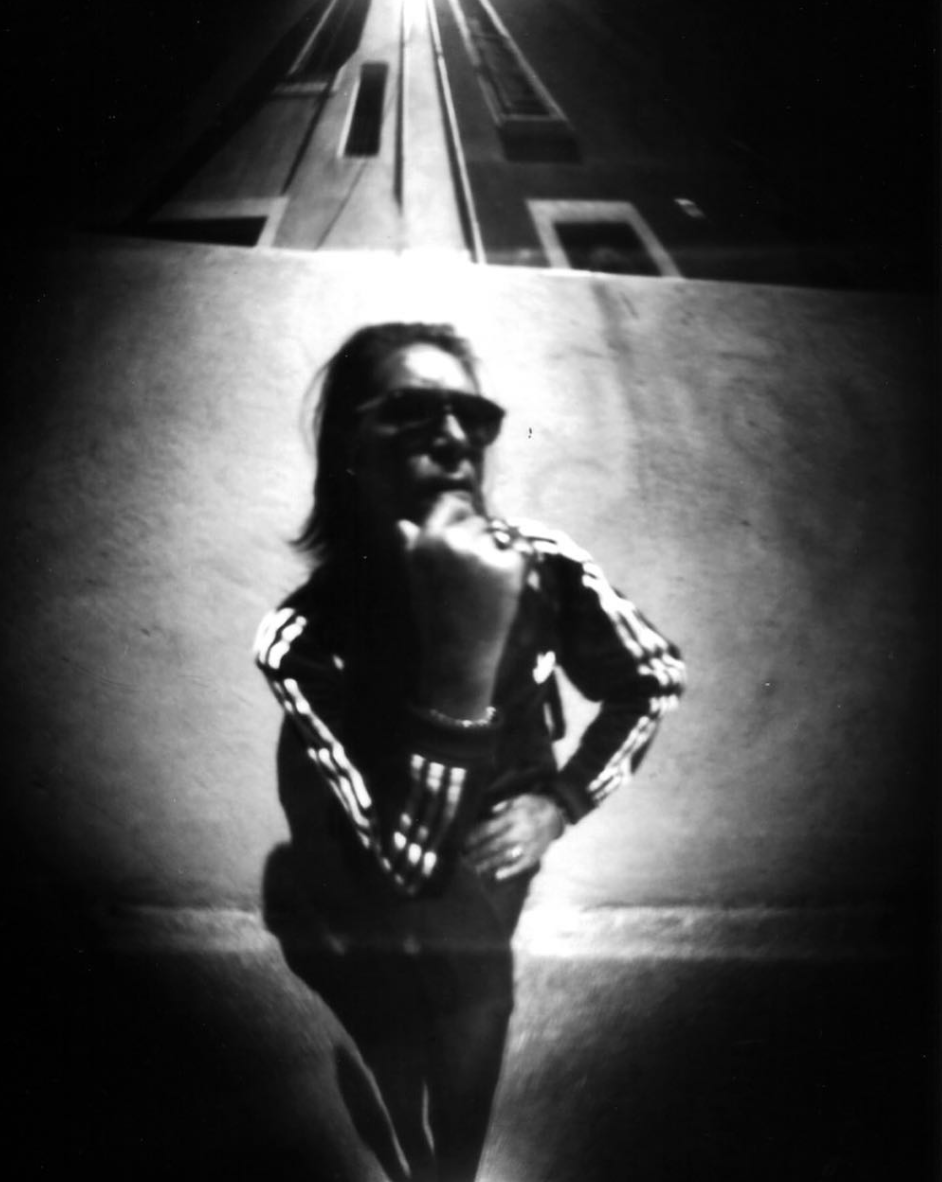
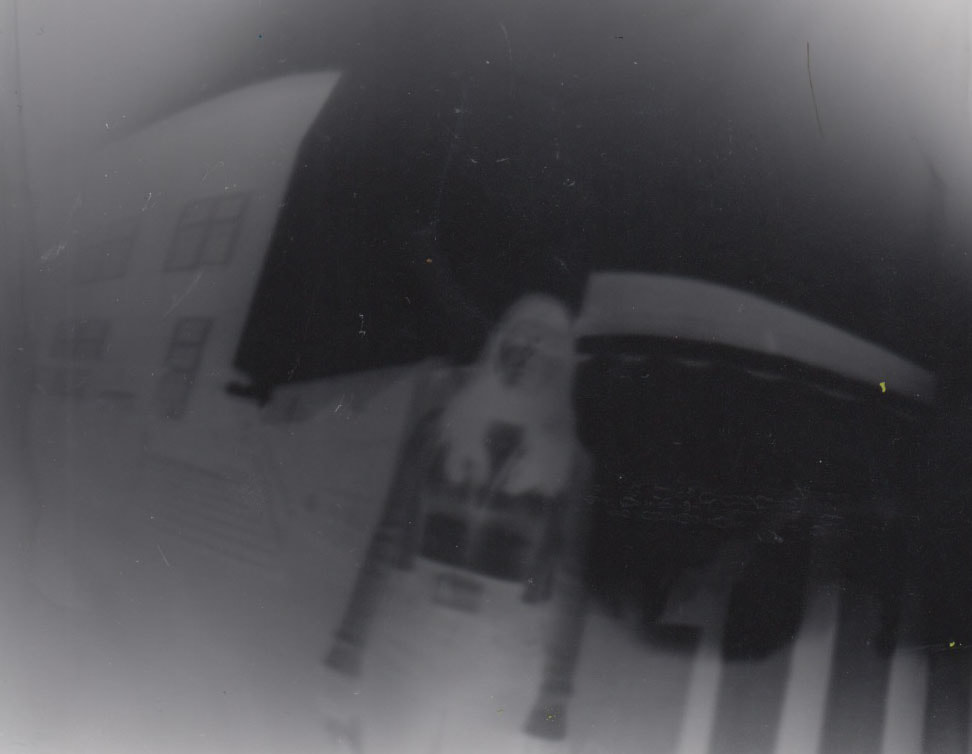
The main focal point drawing your attention within this images the subject posing in the centre of the picture. The black outline of the hole from the beer can creates this framing effect around the woman, which makes it even more eye-catching.
|
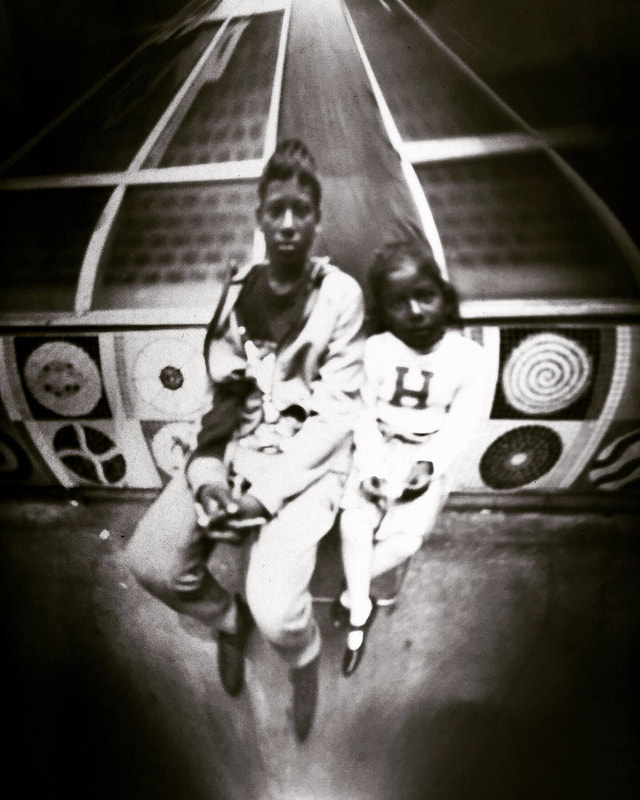
The detail and pattern on the wall is extremely visible. The main focal point drawing your attention is the two children in the centre of the image.
|
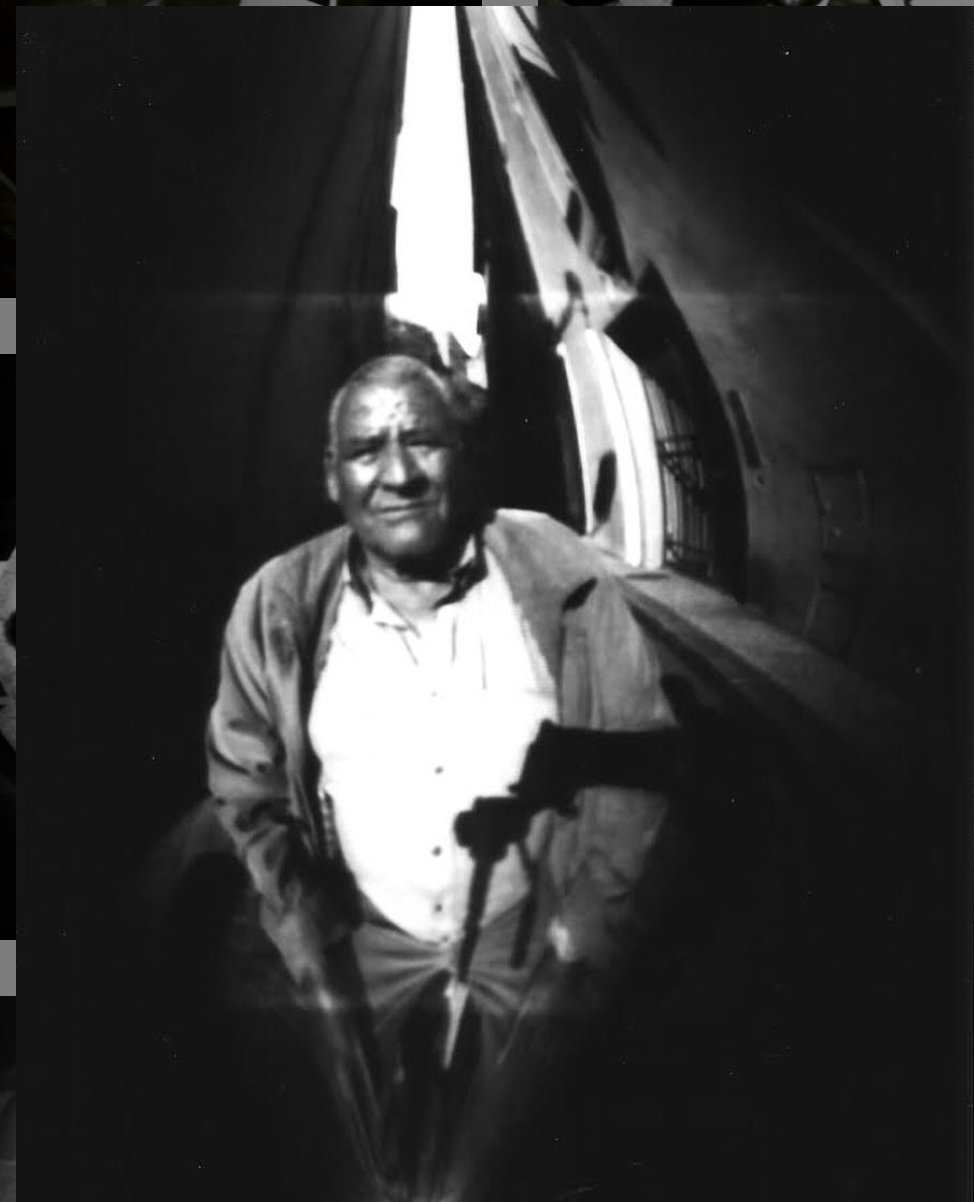
I really like the composition of this image, the way the walls of the buildings either side of the man appear to be bending towards each other creates an alien like effect.
|
My response
For my response, I used my pin hole camera to create images inspired by Ben Nathan. To do this, once I had made my camera, I put a piece of light sensitive paper inside and shut the lid, making sure that the shiny side was facing the pinhole, and the paper wasn't covering the pinhole. I then did an experimental exposure test in order to find the correct exposure time. The exposure time differed whenever the sun came out or went in, and so I had to do several tests each day I was shooting. For example for my portrait, I got the subject to stand on a bench while I put the camera on a flat surface and opened the tape over the pinhole for 8 seconds. Once the image has been taken the paper should not be exposed to light again as it is light sensitive and so will darken when exposed. The chemical processing int he darkroom is the same as it is for developing photograms; developer (2mins), stop (1 min), fix (5 mins), water bath (5 mins).
Portrait
I shot this image from a table, and got the subject to stand on the seat in order to be in the frame. I exposed this image for 3 seconds as the sun was quite bright when shooting. My positive print has more detail visible such as the brick outlines on the building behind the subject, however my negative print looks more defiant and has a greater contrast although it is reversed.
|
Negative
|
Positive

|
Building
Similar to my portrait, I shot this image from a table, took off the electrical tape and exposed it for 3 seconds because the sun was out while shooting. The outline of the building is very clear in both the positive an negative versions, however the bottom left corner is quite dark so maybe if I was to reshoot I would slightly lower the exposure time to 3.5 seconds.
|
Negative

|
Positive

|
Window View
I shot this image from the top floor of a building, with a view overlooking trees and houses, and I exposed to for 4 seconds. It is evident I didn't keep the can completely still while exposing because the image is a bit blurry, ands if I were to shoot again I would make sure I kept it still. I like the composition of the window which frames the view, and the contrast between the drama and they sky creates a moody tone. The focal point of the image is the view of the sky, trees and buildings, and I think my composition compliments it.
|
Negative

|
Positive

|
Project 3: The film camera
35mm Manual SLR Camera
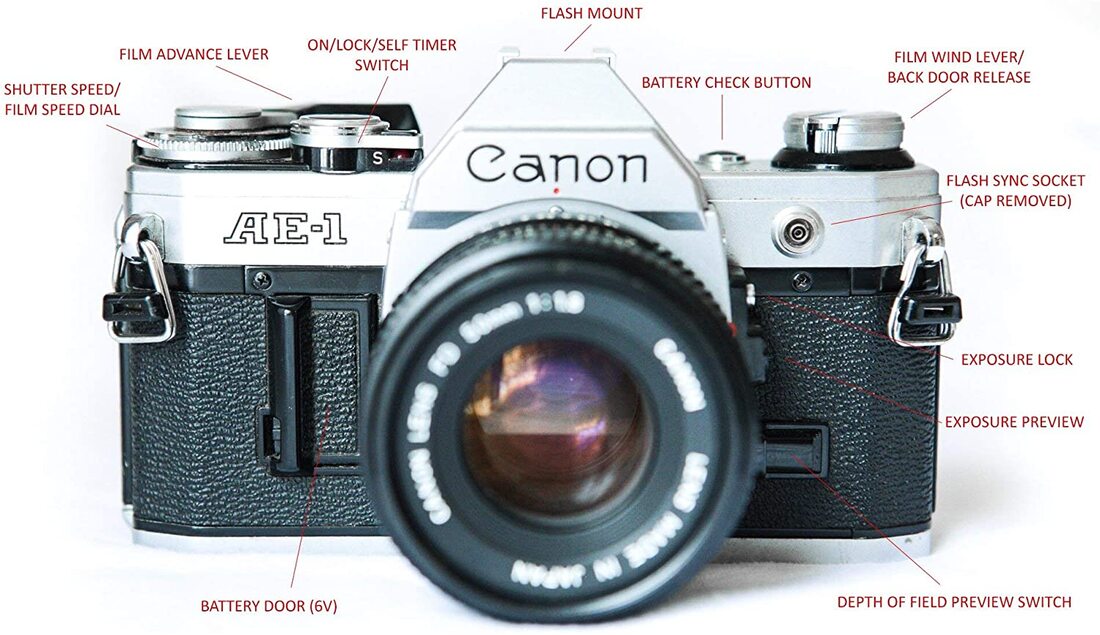
A film camera consists of a roll of film and chemical emulsion on a plastic material that is sensitive to light. When exposed, an inverted image of the scene is created within the chemical layer of the material. To take a picture with a film camera you insert a roll of film into the camera and use the lever to move the film across so that you aren't exposing the same section over and over. Each time you photograph, you must remember to focus the image by aligning the line in the circle through the viewfinder. The shutter speed setting determines how fast camera shutter opens and closes when taking a photo. Long shutter speeds open the shutter for more time, letting in more exposure and light. If you leave the shutter open for too long, the image will become overexposed.
Having taken your film, it is very important that you do not open your camera without having checked that the film has been rewound.
1.) My first task was to take a number of close up portrait shots of a model so that I get a range of different exposures by using a fixed speed and all the aperture settings i.e.
-Speed Setting = 1/125 second
-Aperture Settings = f4 to f16
2.) The second task was to try to capture a moving scene against a simple background. This time i kept the Aperture fixed i.e.
Aperture Setting = f8
Speed = 1/500 sec to 1 sec
3.)The final task was to find a simple background wall and ask a friend to jump. Then take three shots of your friend jumping using the following shutter speeds:
1 second (1")
1/125 second
1/500 second
Developing and processing the film
How to load film into the camera:
- First, locate the Rewind Knob on the left side of the camera, and pull up until the back of the camera opens.
-Second, place the film into the left side of the camera. Push the Rewind Knob down to create a snug fit on the film after it is placed into the pocket.
-Pull the leader of film over to the take-up spool. Insert the narrow end of the film leader into the slot.
-Use the rewind knob to take in any slack in the film, tighten the film to the camera. Then close the back of the camera and use the film advance to wind the film.
Developing Process:
Once the photos have been shot, the film need to go through a specific process in order to be developed. The first part of this process must occur in complete darkness with no light, because the film is extremely sensitive to light. Before you begin, you must set up everything you will need in the dark room and make sure you know where each item is, because you won't be able to see anything once the process has begun. The first step in this process is to open the film cassette by hooking the edge of the lid under the cassette opener, and then then bending it to the side until the lid pops off. You then take your film out and cut of the end of the film using scissors. The next step is to load the film onto the film spool, by feeling where the 2 metal ball bearings are and sliding the film underneath and then wind it round. Next, you place the film spool onto the agitating rod and place it upright into the container. Place the lid tightly on the container, so that the rest of the process can occur in light and not in the darkroom.
The first thing in the second half of the process is to mix the chemicals correctly. You need a developer, a stop, and a fix, and when mixing the water with the chemicals, you need to use a thermometer to make sure the temp is 20 degrees Celsius.. Open the lid of the container and pour the developer in, close the lid and turn the container 4 times and then slam it on the table so that air bubbles don’t interfere with the developing procedure every minute; the tank must be agitated regularly. Every 1 minute, you turn the tank consistently, and after 6 mins you pour it out. You then pour in the stop, and turn the tank around for half a minute. Finally the stop can be poured out back into the storing jar and the fix goes in for 5 minutes, again turning it every minute. After 5 minutes you pour the fix out and remove he film strip from the tank. Use a specialized film squeegee to take off any excess water and the hang it up to dry.
My individual prints
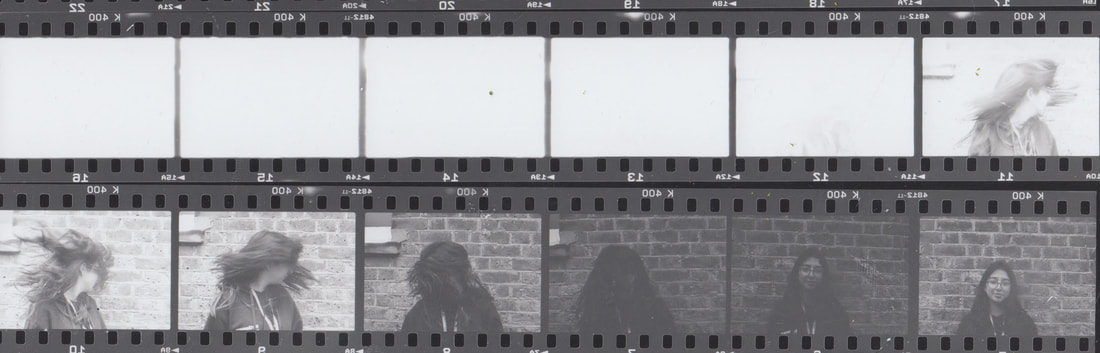
Contact sheet
Below is my contact sheet. To make the contact sheet we used a 'sandwich print' style, by putting the sheet of film on top of the photographic paper and putting them under the enlarger. I then placed a piece of glass on top and I exposed the light for 5 seconds because thats what my test strip indicated, using the timer. Doing. test strip is important when using larger pieces of paper, in order to reduce waste. Finally you develop the sheet as you would any other time; developer, stop, fix, water bath.
Overall I am happy with the way my prints were composed.
Overall I am happy with the way my prints were composed.

As we can tell from this strip, the white indicates the image is overexposed and too much light has been let in. In this images I was trying to capture movement while the model shook her head. I started at the bottom, leaving the aperture Setting at f8 and the speed ranging from 1/500 sec to 1 sec. As we can tell, the longer the shutter speed, the more overexposed and blurred the image became. The shorter the shutter speed, the darker but less blurry the image turns out. I think the second to the left on the bottom row has a good balance between these 2 extremes.
Portraits

This was my third attempt at developing this photo and it is by far the best version. I used a filter in order to increase contrast levels. My two previous attempts were either too dark or too light, this image has turned out to be a good balance of the two.

Again this image took several attempts at developing, however I am ver happy with the way this version has come out.
Movement

With this image I captured the movement of my models hair.
Test strips

|

|

|
WWW- For my first attempt I think that the quality of the images is good, despite it taking several attempts to have the correct developing time, my imaged have come out with balanced contrast.
EBI- next time using film, I will make sure that every time I take a photo, that I readjust the blur so that my images come out more clearly. As we can tell from the contact sheet, my exposure time was sometimes too long or too short, so next time I'll be careful and judge the timings better.
EBI- next time using film, I will make sure that every time I take a photo, that I readjust the blur so that my images come out more clearly. As we can tell from the contact sheet, my exposure time was sometimes too long or too short, so next time I'll be careful and judge the timings better.
